Want to display customer reviews from Google on your Lightspeed eCom C-Series storefront? For one content page, add the Widget House script URL once through Web Extras and place the widget container in the page's Source Code. To display the widget across your storefront, add the complete installation code to the shared custom.rain layout.
Before you begin, make sure you've created your widget and copied the installation code from your Widget House dashboard
Step-by-step guide to getting your Widget House widget code
Choose How You Want to Display the Widget
Add the widget to a single page
Log in to your Lightspeed eCom Back Office and open the store where you want to install the Google Reviews Widget.
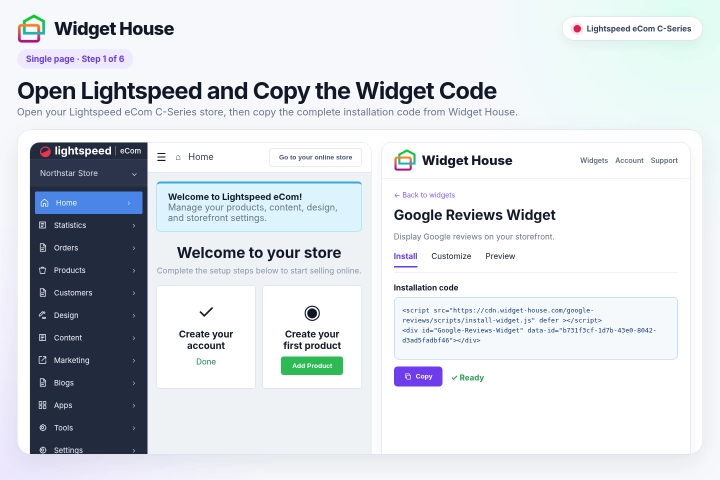
Open your Widget House dashboard and copy the complete installation code generated for your widget.
The installation code contains two parts: a loading <script> and a visible <div> container with your unique widget ID.
Compatibility: This guide is for Lightspeed eCom C-Series. Lightspeed eCom E-Series and other Lightspeed products use different website editors and installation methods.
Important: Keep both parts of the installation code. In the following steps, you will add the script URL through Lightspeed Web Extras and place the widget container in the exact page position where the reviews should appear.
Step 1: Open Lightspeed and Copy the Widget Code
Lightspeed can remove external <script> elements from content entered through the regular page editor. To keep the Widget House loader available, add its URL through Web Extras.
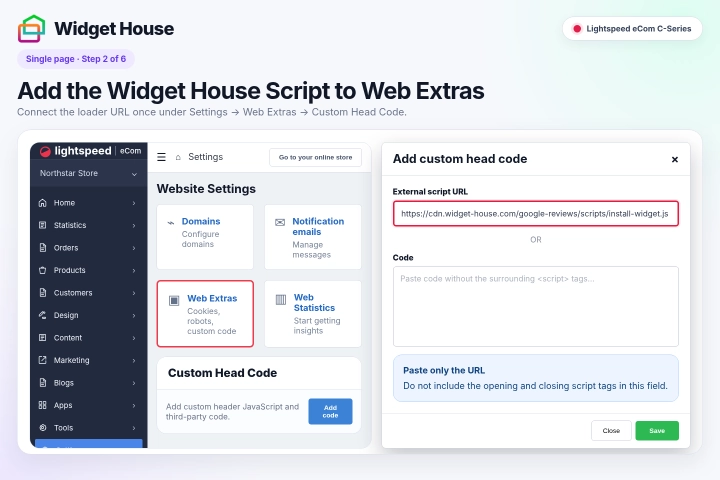
In the Lightspeed Back Office, go to Settings → Web Extras.
Scroll to Custom Head Code and click Add code.
Find the External script URL field and paste only the Widget House script URL:
https://cdn.widget-house.com/google-reviews/scripts/install-widget.js
Do not paste the surrounding <script> tags into the External script URL field.
Set the code status to Enabled if this setting is available, then click Save.
You only need to add this script URL once. Lightspeed loads it across the storefront, but the Google Reviews Widget appears only on pages that contain its matching <div> container.
Step 2: Add the Widget House Script to Web Extras
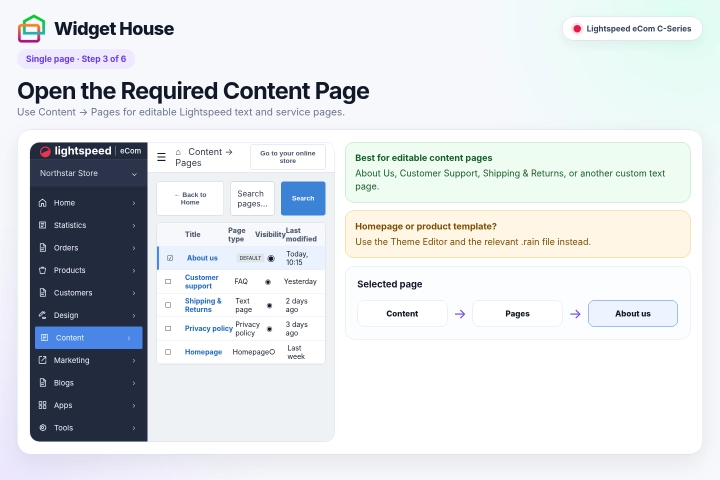
In the Lightspeed Back Office, go to Content → Pages.
Select the content page where you want the Google Reviews Widget to appear.
This method is intended for editable Lightspeed content pages, such as About Us, Customer Support, Shipping & Returns, or another custom text page.
If the page is not currently visible on your storefront, enable its visibility or publication setting before continuing.
If you need the widget on the homepage, a product page, a category page, or another position controlled by the theme, use the Theme Editor and add the widget to the corresponding .rain template instead.
Step 3: Open the Required Content Page
Find the page's Content editor.
Click the Source Code or <> button to open the HTML source.
The Google Reviews Widget is static, which means it appears exactly where its container is placed in the page content.
Choose the exact location where visitors should see the reviews. For example, you can place the widget after an introduction, below a service description, above a contact section, before a call-to-action, or near the bottom of the page.
Insert the container between complete HTML elements. Do not paste it inside a paragraph, link, image, list, form, opening tag, or another script.
A wide content area is usually the best choice for a reviews slider, carousel, or grid.
Step 4: Open Source Code and Choose the Widget Position
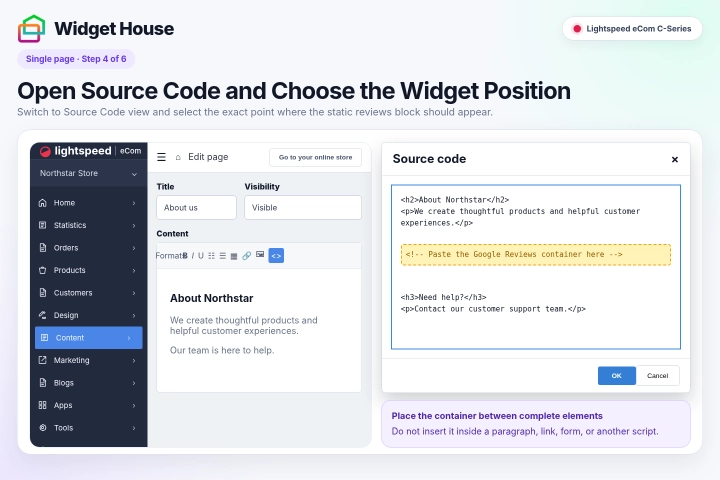
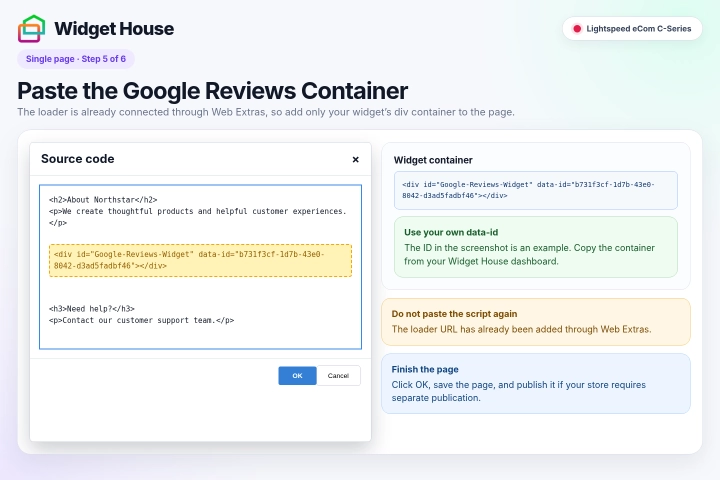
Because the Widget House script is already connected through Web Extras, paste only the Google Reviews container into the selected page position.
Copy the complete <div> from the installation code generated in your own Widget House dashboard.
Do not change the container ID or your unique data-id.
Do not paste another copy of the loading script into the page content. The script has already been connected through Web Extras.
Click OK to close Source Code view, then save the page.
If Lightspeed requires pages to be published separately, return to the Pages list, select the updated page, and use the publication controls to publish it.
The container shown in the screenshots is an example. Always use the container and unique widget ID generated for your own Google Reviews Widget.
Step 5: Paste the Google Reviews Container
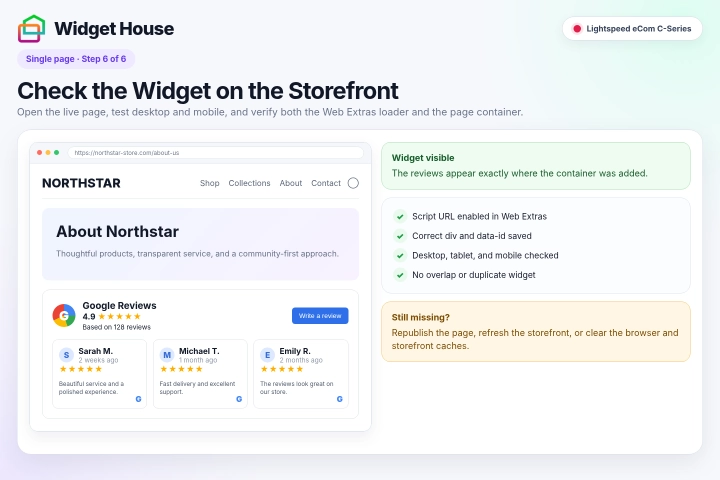
Open the published page on your live storefront and make sure the Google Reviews Widget appears in the selected position.
Check the page on desktop, tablet, and mobile devices. Make sure the reviews are fully visible and do not overlap text, images, forms, buttons, or other page content.
If the widget is missing, confirm that the Widget House script URL is enabled under Settings → Web Extras.
Reopen the page in Source Code view and make sure the complete Google Reviews <div> container and your unique data-id were saved.
If the installation code appears as visible text, make sure the container was inserted through Source Code view rather than the regular visual editor.
You may also need to republish the page, refresh the storefront, open it in a private browser window, or clear your browser and storefront caches.
Step 6: Check the Widget on the Storefront
Show the widget on All pages
Show It on All Pages of Your Website
Because the Google Reviews Widget is static, place it inside a visible shared layout when you want it to appear across your Lightspeed storefront.
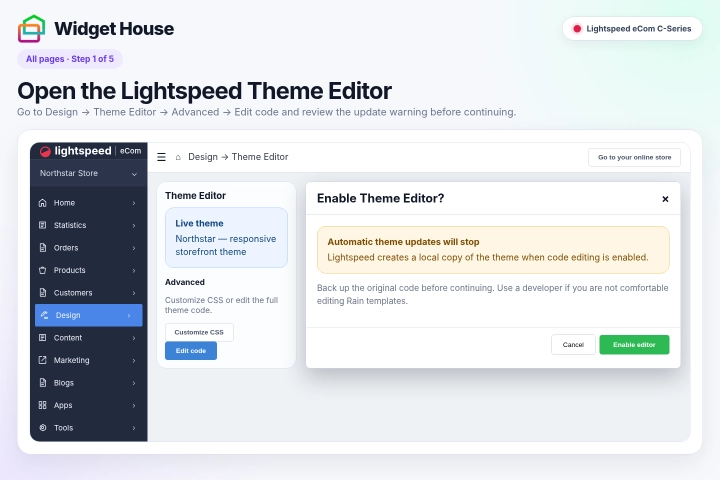
In the Lightspeed Back Office, go to Design → Theme Editor.
Open the Advanced section and click Edit code.
Confirm the warning to enable the Theme Editor.
Important: When you enable Theme Editor, Lightspeed creates a local copy of the theme. Your store will no longer automatically receive updates from the original theme.
Before changing the code, save a copy of the original section that you plan to edit. If you are not comfortable editing HTML or Rain templates, ask a website developer for help.
Step 1: Open the Lightspeed Theme Editor
In the Theme Editor file list, open the Layouts section.
Select custom.rain.
The custom.rain file contains the shared storefront structure used by standard theme pages.
Changes made to this file can affect every storefront page that uses the shared layout, so review the surrounding markup carefully before adding the widget.
If your customized theme does not contain custom.rain, open the shared Layout file used by your storefront or ask your theme developer to identify it.
Step 2: Open the Shared custom.rain Layout
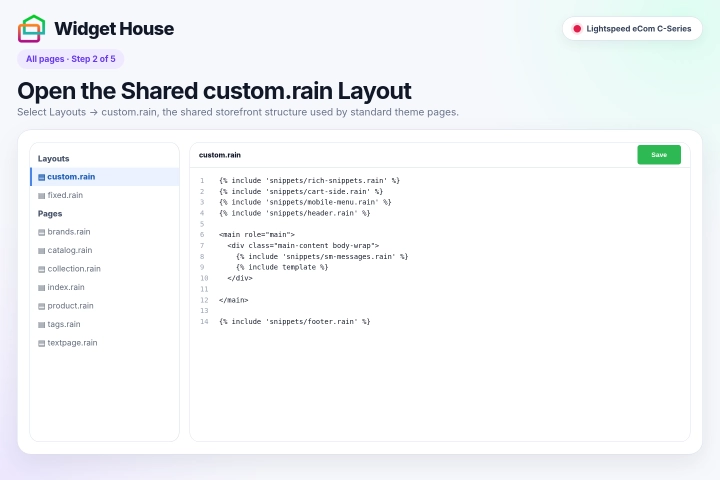
Find the closing </main> tag inside custom.rain.
To display the Google Reviews Widget near the bottom of the main page content and above the storefront footer, place the installation code immediately before this closing tag.
This keeps the static widget inside the visible page layout rather than loading it as an uncontrolled script at the end of the document.
Make sure you paste the code between complete HTML or Rain template blocks and not inside another tag, conditional statement, loop, or script.
If your customized theme has a different structure or does not contain the expected </main> tag, ask a developer to identify the shared visible content wrapper above the footer.
Step 3: Choose a Site-Wide Widget Position
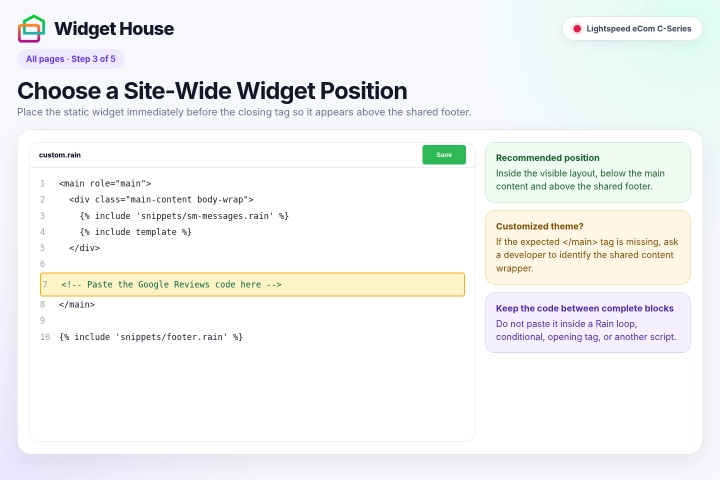
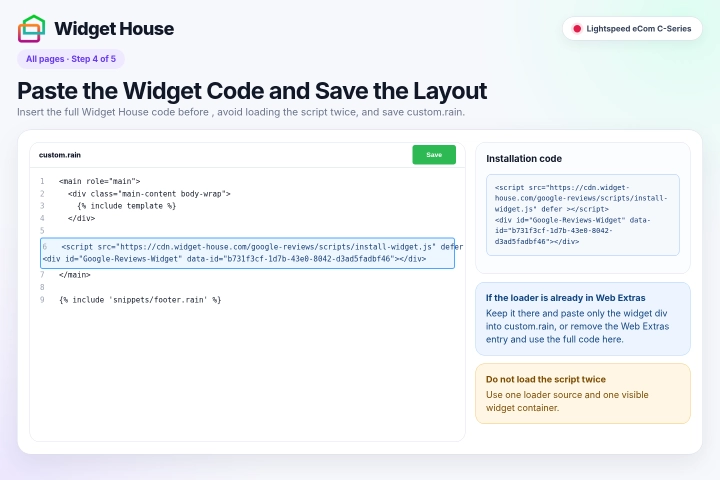
Paste the complete Google Reviews Widget installation code from your Widget House dashboard immediately before the closing </main> tag.
Keep the loading <script> and the Google Reviews <div> container together and in the original order.
Do not edit the script URL, container ID, widget ID, or any other part of the installation code.
If you previously added the Widget House script URL under Settings → Web Extras, choose one of these options:
Option 1: Remove the Web Extras entry and paste the complete installation code into custom.rain.
Option 2: Keep the loader in Web Extras and paste only the widget's <div> container into custom.rain.
Do not intentionally load the same script twice.
Click Save in the Theme Editor.
The code shown in the screenshots is an example. Always use the installation code generated for your own widget before saving the layout.
Step 4: Paste the Widget Code and Save the Layout
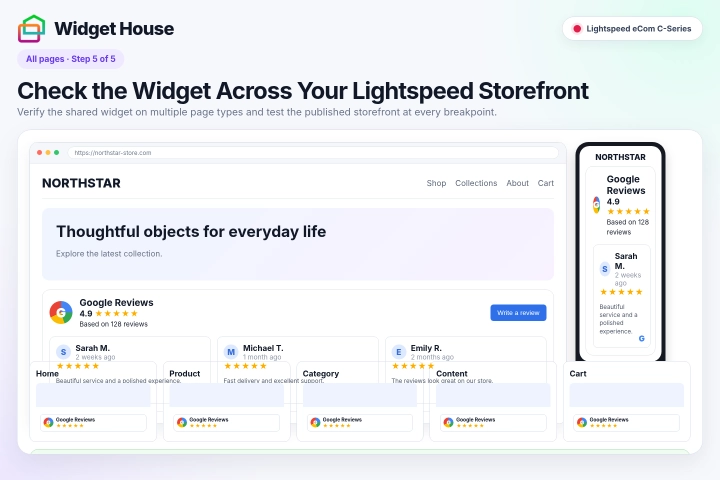
Open several live storefront pages, such as the home page, a product page, a category page, a content page, and the cart if applicable.
The Google Reviews Widget should appear in the same shared position on every storefront page that uses the updated custom.rain layout.
Check the widget on desktop, tablet, and mobile devices. Make sure it is fully visible and does not overlap product information, navigation, filters, forms, cart controls, or footer content.
If the widget is missing from a particular page, that page may use a different Rain layout or a system-controlled storefront flow.
If the widget appears twice, make sure the installation code was not added both through Web Extras and the theme layout with two visible containers, or inserted directly into an individual content page as well.
If your latest changes are not visible, confirm that the Theme Editor changes were saved, then refresh the storefront and clear any browser or storefront cache.
If theme functionality or styling is affected, restore the original code section or reinstall the original theme from the Lightspeed Theme Store. Reinstalling the theme can reset its settings.
Step 5: Check the Widget Across Your Lightspeed Storefront
All set. Your Google Reviews Widget should now be working on your Lightspeed eCom storefront.
Need a hand with setup?
Contact our support team at support@widget-house.com and we will help you get the widget running on your Lightspeed store.
support@widget-house.com