Want to display customer reviews from Google in your PrestaShop store? For one content page, connect the Widget House loader through a trusted HTML/JavaScript module and place the widget container in the page content. To display the widget across your storefront, add the complete installation code to a shared footer hook.
Before you begin, make sure you've created your widget and copied the installation code from your Widget House dashboard
Step-by-step guide to getting your Widget House widget code
Choose How You Want to Display the Widget
Add the widget to a single page
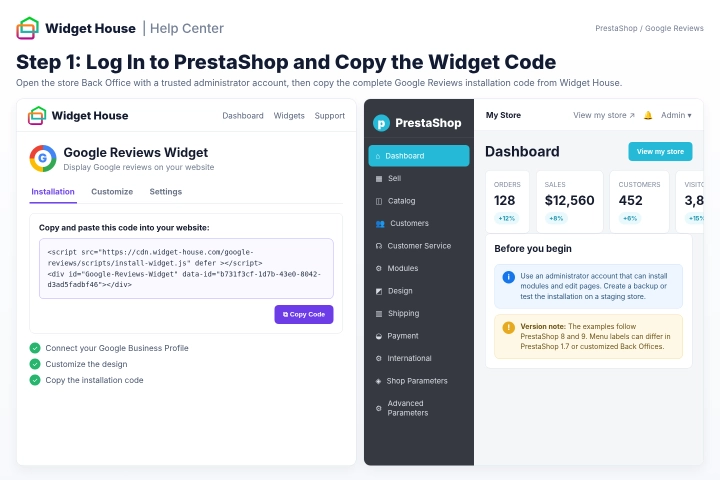
Log in to your PrestaShop Back Office using an account that can install and configure modules and edit website pages.
Open your Widget House dashboard and copy the complete installation code generated for your Google Reviews Widget.
The installation code contains two parts: a loading <script> and a visible <div> container with your unique widget ID.
Keep both parts of the installation code. For a single-page installation, you will connect the script through an HTML/JavaScript module and place the visible container in the exact page position where the reviews should appear.
Version note: This guide follows the standard PrestaShop 8 and 9 Back Office workflow. Menu labels and editor controls may look slightly different in PrestaShop 1.7, customized administrative themes, or stores with additional modules.
Before you begin: Create a store backup or test the installation in a staging environment before adding custom code to a live storefront.
Step 1: Log In to PrestaShop and Copy the Widget Code
PrestaShop content editors can filter external scripts, so we recommend connecting the Widget House loader through a dedicated HTML/JavaScript module.
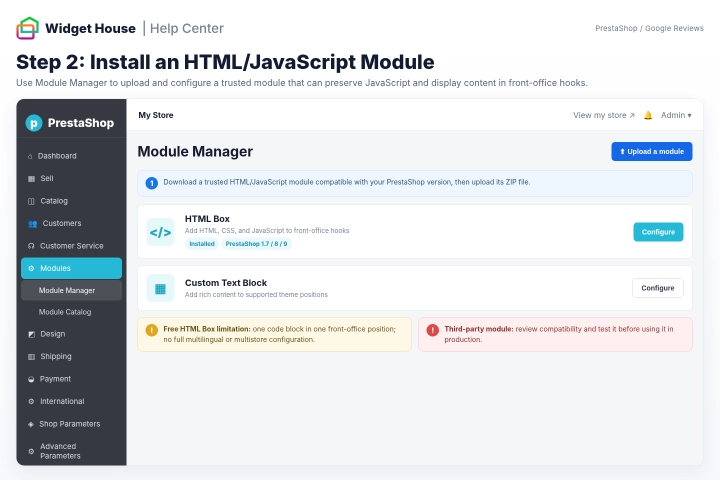
This guide uses the free PrestaShop HTML Box module as an example. You can use another trusted module if it accepts HTML and JavaScript and supports front-office hooks.
Download the module version that is compatible with your PrestaShop installation.
In the PrestaShop Back Office, go to Modules → Module Manager. In some versions, this section may appear under Modules → Modules & Services.
Click Upload a module and upload the module's ZIP file.
After the installation is complete, click Configure.
Module limitation: The free HTML Box version supports one code block in one front-office position and does not provide full multilingual or multistore support. If your store needs separate configurations for multiple languages or stores, several code blocks, or advanced page targeting, use a compatible alternative module, the extended module version, or ask a PrestaShop developer for help.
Third-party module notice: HTML Box is not developed by Widget House or PrestaShop. Review the module, confirm its compatibility with your store version, and test it before using it in production.
Step 2: Install an HTML/JavaScript Module
Open the HTML Box or other HTML/JavaScript module settings.
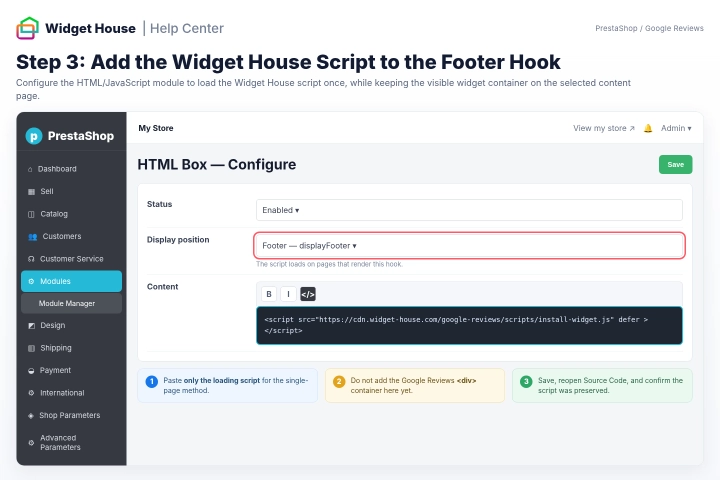
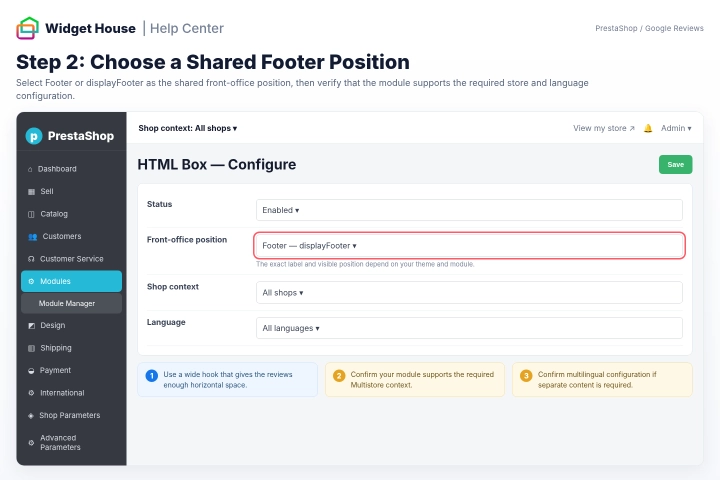
In the position or Where you want to display content setting, select Footer. Depending on the module and theme, this position may be labeled displayFooter.
Open the module editor's Source Code or </> view.
Paste only the Widget House loading script:
<script src="https://cdn.widget-house.com/google-reviews/scripts/install-widget.js" defer ></script>
Do not add the Google Reviews <div> container to the module for this single-page installation.
Save the module settings.
The loading script is now available on storefront pages that render the selected hook. The Google Reviews Widget itself will appear only on a page that contains its matching <div> container.
Reopen the module's Source Code view and confirm that the complete <script> tag was preserved after saving.
Step 3: Add the Widget House Script to the Footer Hook
For a standard PrestaShop content page, go to Design → Pages.
Find the page where you want the Google Reviews Widget to appear and click Edit.
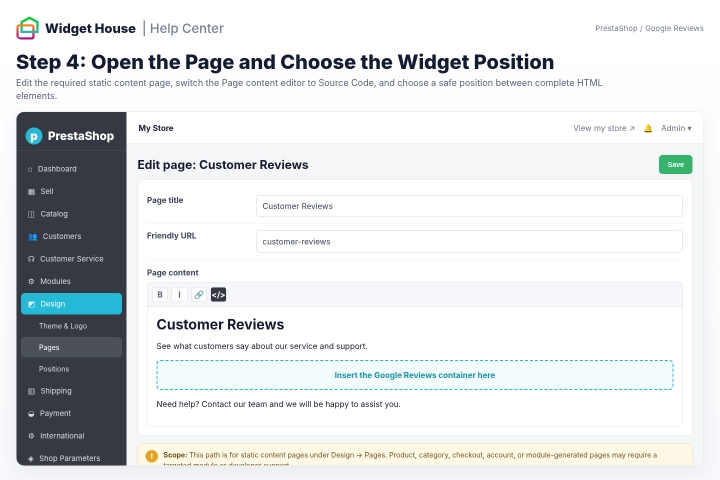
Scroll to the Page content editor and click its Source Code or </> button.
The Google Reviews Widget is static, which means it appears exactly where its container is placed in the page content.
Choose a visible position below a service description, above a contact section, before a call-to-action, inside a testimonials area, or near the bottom of the page.
Insert the container between complete HTML elements. Do not place it inside an opening tag, paragraph, link, image, list, form, or another element's attribute.
Scope: This workflow is intended for static content pages managed under Design → Pages. A specific product, category, checkout, customer account, or extension-generated page may require a module with page-targeting options or help from a PrestaShop developer.
Step 4: Open the Page and Choose the Widget Position
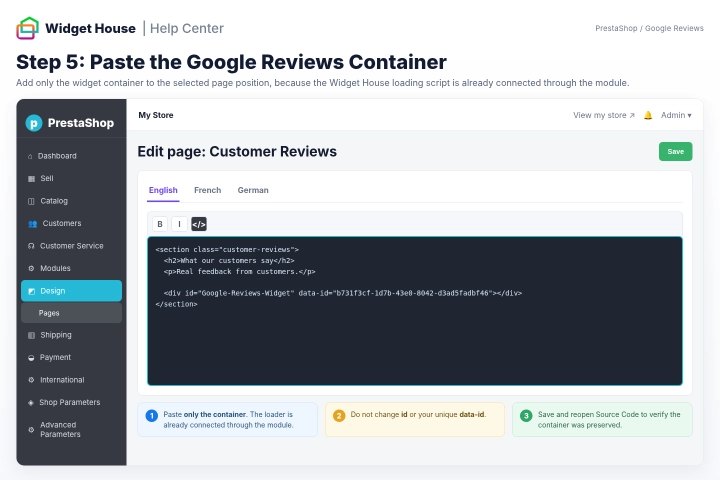
Because the Widget House loader is already connected through the HTML/JavaScript module, paste only the Google Reviews container into the selected page position.
Copy the complete <div> from the installation code generated in your own Widget House dashboard.
Do not change the container ID or your unique data-id.
Do not paste a second copy of the loading script into the page content.
If your store supports several languages, add the container to each page translation where the widget should be displayed.
Click Save.
Reopen the page's Source Code view and make sure the complete Google Reviews container and its data-id were preserved.
The container shown in the screenshots is an example. Always use the unique widget ID generated for your own Google Reviews Widget.
Step 5: Paste the Google Reviews Container
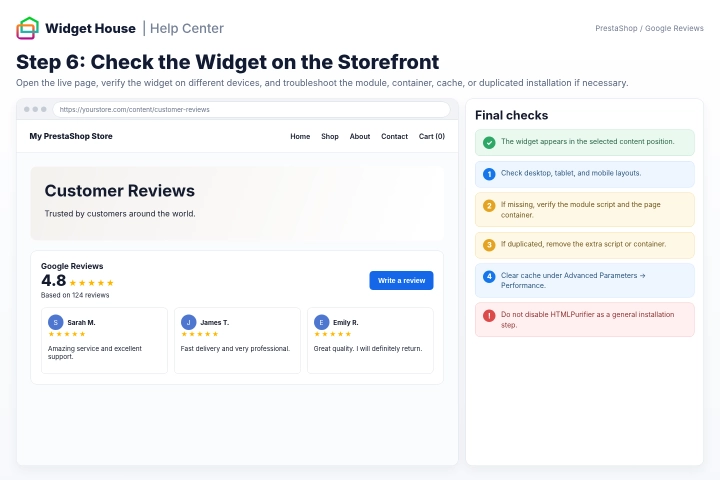
Open the live content page in a new browser tab and make sure the Google Reviews Widget appears in the selected position.
Check the page on desktop, tablet, and mobile devices. Make sure the reviews are fully visible and do not overlap navigation, text, images, forms, buttons, or other content.
If the widget is missing, reopen the HTML/JavaScript module and confirm that the complete Widget House script was saved and the module is enabled.
Reopen the page in Source Code view and confirm that the Google Reviews <div> and your unique data-id are still present.
If the widget appears twice, check whether the complete installation code was added both through the module and directly to the page.
If the script or container was removed during saving, use a compatible HTML/JavaScript module or ask a trusted PrestaShop developer to review the editor and security configuration.
Do not disable PrestaShop's HTMLPurifier protection as a general installation step.
If your latest changes are not visible, go to Advanced Parameters → Performance, clear the PrestaShop cache, and refresh the storefront in a private browser window.
Step 6: Check the Widget on the Storefront
Show the widget on All pages
Show It Across Your Storefront
Important: The Google Reviews Widget will appear on storefront pages that render the selected shared hook. Checkout, customer account, extension-generated, or custom-theme pages may use different templates and require a separate installation.
Because the Google Reviews Widget is static, it needs a visible shared position when you want it to appear across your storefront.
Go to Modules → Module Manager and find the HTML/JavaScript module that you want to use.
If you have not installed one yet, download a compatible HTML Box or Custom HTML module, click Upload a module, upload its ZIP file, and complete the installation.
Click Configure to open the module settings.
If you previously used the single-page installation method, remove the Google Reviews container from the individual page before switching to the storefront-wide installation. Otherwise, the widget may appear twice on that page.
If you use the free HTML Box version, remember that it supports one code block in one position and does not provide full multilingual or multistore configuration.
Step 1: Install or Open the HTML/JavaScript Module
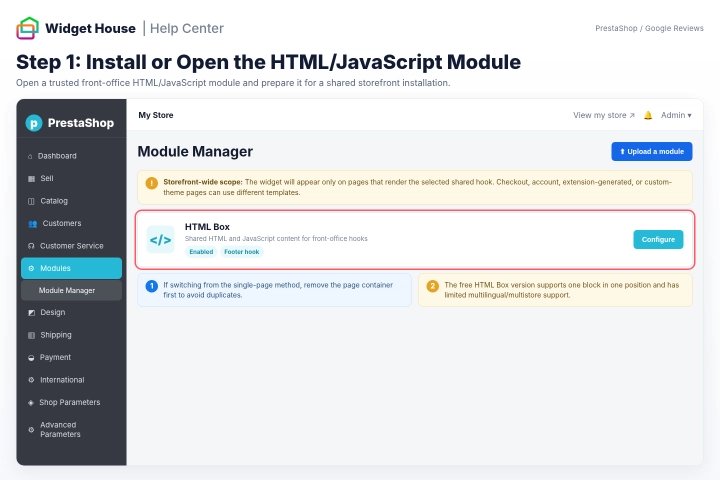
In the module settings, select Footer or displayFooter as the front-office position.
The exact label and visual location depend on the module and the active PrestaShop theme.
A wide footer hook is usually suitable for a static reviews section because it provides a consistent visible position across storefront pages.
If your module offers several footer or content hooks, select one that gives the Google Reviews layout enough horizontal space.
If your PrestaShop installation uses Multistore, confirm that the selected HTML/JavaScript module supports separate configuration for the required store or shop group.
If your store uses several languages, confirm that the selected module supports multilingual code or content when separate language configurations are required.
Step 2: Choose a Shared Footer Position
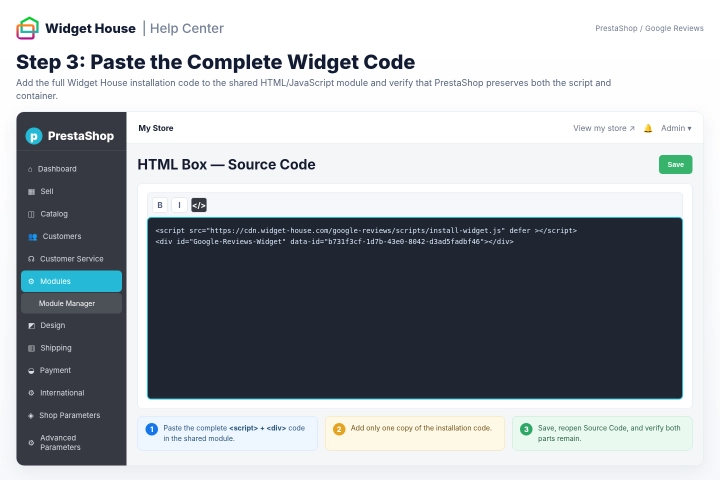
Open the module editor's Source Code or </> view.
Paste the complete Google Reviews Widget installation code from your Widget House dashboard.
Keep the loading <script> and the Google Reviews <div> container together and in the original order.
Do not edit the script URL, container ID, widget ID, or any other part of the installation code.
Add only one copy of the complete installation code to the module.
Save the module settings.
Reopen Source Code view and confirm that both the <script> and <div> were preserved after saving.
The code shown in the screenshots is an example. Always use the installation code generated for your own widget before saving the module.
Step 3: Paste the Complete Widget Code
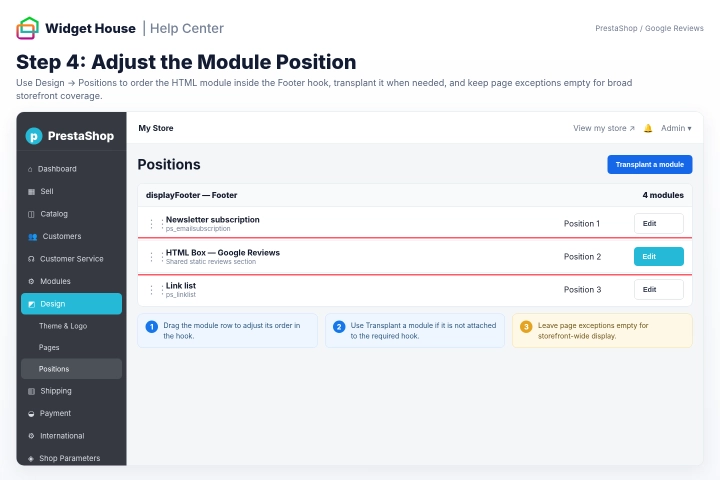
Go to Design → Positions.
Use the module filter or search field to find the HTML Box or Custom HTML module in the selected Footer hook.
Drag the module row or use the available up and down controls to adjust its order within the hook.
If the module is not attached to the required hook, click Transplant a module, select the module, and choose the appropriate Footer hook.
Not every module can be attached to every hook. If the required hook is unavailable, choose another position supported by the module or use a different compatible module.
For a storefront-wide installation, leave page exceptions empty unless you intentionally want to exclude specific pages.
Save the position changes.
Step 4: Adjust the Module Position
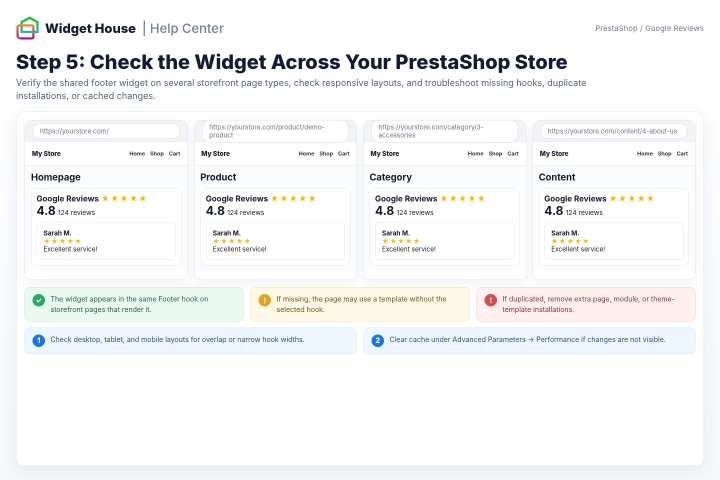
Open several live storefront pages, such as the homepage, a product page, a category page, a static content page, the contact page, and the cart.
The Google Reviews Widget should appear in the selected Footer position on every page that renders that hook.
Check the widget on desktop, tablet, and mobile devices. Make sure it is fully visible and does not overlap navigation, forms, payment information, buttons, or other footer content.
If the widget is missing from a particular page, that page or storefront flow may use a different template that does not render the selected hook.
If the widget appears twice, check whether the code was also added directly to a content page, another module, or a theme template.
If the widget is too narrow, select a wider hook or adjust the surrounding theme layout.
If the latest changes are not visible, go to Advanced Parameters → Performance, clear the PrestaShop cache, and refresh the storefront in a private browser window.
Step 5: Check the Widget Across Your PrestaShop Store
All set. Your Google Reviews Widget should now be working on your PrestaShop store.
Need a hand with setup?
Contact our support team at support@widget-house.com and we will help you get the widget running on your PrestaShop store.
support@widget-house.com