Want to display customer reviews from Google on your Shopify store? This guide explains how to add the Widget House Google Reviews Widget to one selected page or display it across your store using the shared footer area.
Before you begin, make sure you've created your widget and copied the installation code from your Widget House dashboard
Step-by-step guide to getting your Widget House widget code
Choose How You Want to Display the Widget
Add the widget to a single page
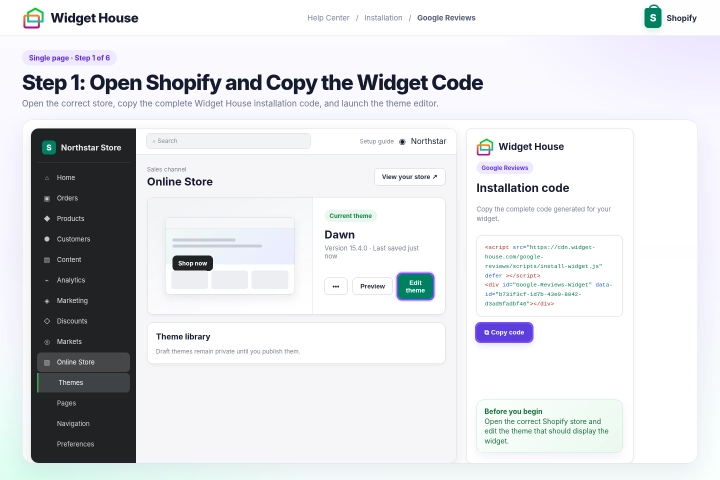
Log in to your Shopify admin and open the store where you want to install the Google Reviews Widget.
Open your Widget House dashboard and copy the complete installation code for your Google Reviews Widget.
In Shopify, go to Online Store, find the theme that you want to edit, and click Edit theme.
Make sure you are editing the correct theme. Changes made to a draft theme will not appear on your live store until that theme is published.
Step 1: Open Shopify and Copy the Widget Code
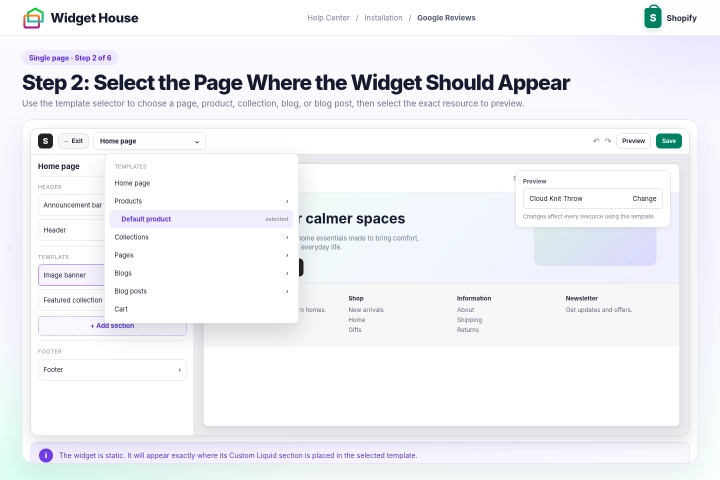
In the theme editor, open the template selector at the top of the page. It displays Home page by default.
Select the type of content where you want to add the Google Reviews Widget, such as a page, product, collection, blog, or blog post.
In the Preview section of the theme editor sidebar, click Change and select the exact page, product, collection, blog, or post that you want to preview.
The Google Reviews Widget is static, which means it appears exactly where its Custom Liquid section is placed in the selected template.
If you are adding the widget to the home page, you can proceed directly to adding the Custom Liquid section because the Home page template is unique.
Step 2: Select the Page Where the Widget Should Appear
Before adding the widget, check whether the selected template is also used by other pages, products, collections, blogs, or blog posts.
Changes made to a Shopify template apply to every resource that uses that template. For example, adding the widget to the default product template can make it appear on every product assigned to that template.
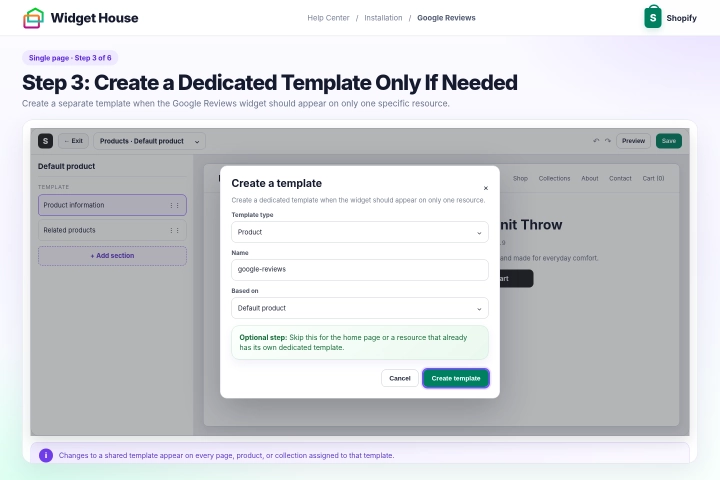
If you want to display the widget on only one resource, open the template selector, select the required template type, and click Create template.
Enter a descriptive name, such as google-reviews, and select the current template from the Based on menu. Then click Create template.
You can skip this step if you are adding the widget to the home page or if the selected resource already uses a dedicated template that is not assigned to other resources.
If the Create template option is unavailable, your theme might not support compatible alternative templates. Ask your theme developer or a Shopify specialist to create a dedicated template for the page.
Step 3: Create a Dedicated Template Only If Needed
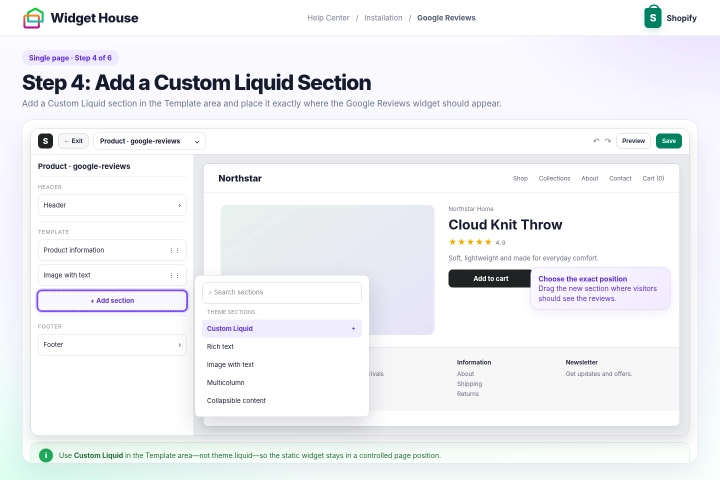
In the theme editor sidebar, find the Template area and click Add section.
Search for and select Custom Liquid.
Drag the new Custom Liquid section to the exact position where you want visitors to see the Google Reviews Widget.
For example, you can place the widget below a product or service description, above a contact form, before a call-to-action, below the main product information, or near the bottom of the page.
Make sure the selected position has enough horizontal space for the Google Reviews layout.
If your theme does not include a Custom Liquid section, avoid pasting the static widget directly into theme.liquid. Ask your theme developer to add a reusable Custom Liquid section so the widget has a controlled position inside the page layout.
Step 4: Add a Custom Liquid Section
Open the new Custom Liquid section and paste the complete Google Reviews Widget installation code from your Widget House dashboard into the Custom Liquid field.
Keep the script and widget container together in the same section and in the original order. Do not remove, split, or change any part of the installation code.
Do not wrap the installation code in additional <script>, <pre>, or <code> tags.
The code shown in the screenshots is an example. Always use the installation code generated for your own widget so the correct reviews and design are displayed.
If your theme provides section settings, adjust the width, color scheme, or top and bottom spacing so the widget fits naturally within the page.
Click Save. If you are editing the published theme, the saved changes are applied to your live storefront. If you are editing a draft theme, preview the changes first and publish the theme when you are ready to make them live.
Step 5: Paste the Google Reviews Widget Code
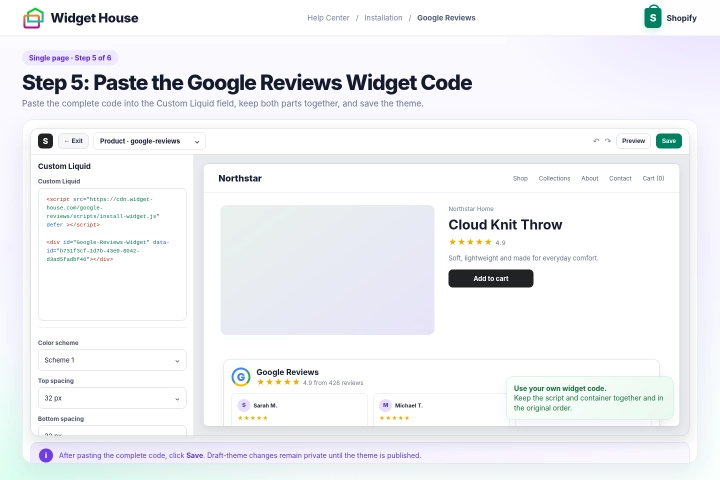
If you created a dedicated template, assign it to the resource where the Google Reviews Widget should appear.
For a standard page, go to Online Store → Pages and open the required page.
For a product, open it under Products. For a collection, go to Products → Collections.
For a blog post, go to Content → Blog posts. For a blog, go to Content → Blog posts → Manage blogs.
Find the Theme template setting, select the dedicated template that you created, and click Save.
Template options in the Shopify admin are based on the templates available in your current published theme. If you created the template in a draft theme, publish that theme before assigning the new template to a resource.
Open the live page in a new browser tab and make sure the Google Reviews Widget appears in the selected position.
Check the page on desktop and mobile devices. Make sure the widget is fully visible and does not overlap product information, buttons, forms, or other content.
Open another resource that was not assigned to the dedicated template and confirm that the widget does not appear there.
If the widget is missing, make sure you edited the published theme, assigned the correct template, saved the Custom Liquid section, and used the complete installation code.
Step 6: Assign the Template and Check the Widget
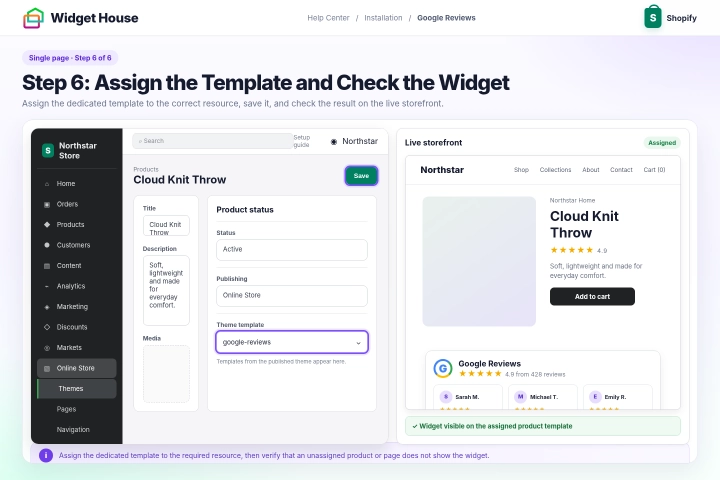
Show the widget on All pages
Show It on All Pages of Your Website
Because the Google Reviews Widget is static, we recommend placing it in Shopify's shared Footer area when you want it to appear across your store.
The shared Footer gives the widget a specific and consistent position instead of inserting it into an uncontrolled location at the end of the page code.
In your Shopify admin, go to Online Store, find the theme that you want to edit, and click Edit theme.
In the theme editor sidebar, expand the Footer area. This area is shared between the Online Store pages that use your theme's standard footer.
Make sure you are editing the correct theme. Changes made to a draft theme will not appear on your live store until that theme is published.
Step 1: Open the Shared Footer Area
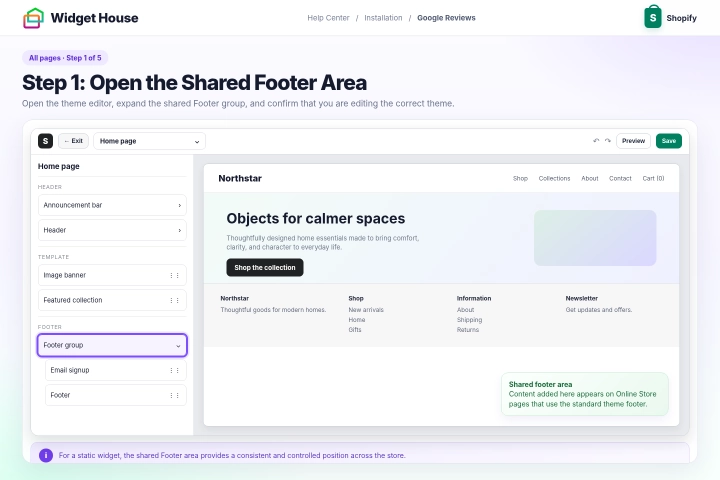
Inside the shared Footer area, click Add section.
Search for and select Custom Liquid.
Move the Custom Liquid section to the exact position where you want the Google Reviews Widget to appear across your store.
A full-width position above the main footer links, newsletter form, payment icons, or copyright information is usually suitable for a reviews section.
Do not add the section to the regular Template area if you want it to appear throughout the store. Sections in the Template area are displayed only on resources that use that particular template.
If your theme does not allow Custom Liquid in the Footer area, ask your theme developer to add a reusable section to the shared footer. Avoid inserting the complete static widget code directly before the closing </body> tag because that does not provide reliable visual control over its position.
Step 2: Add a Custom Liquid Section to the Footer
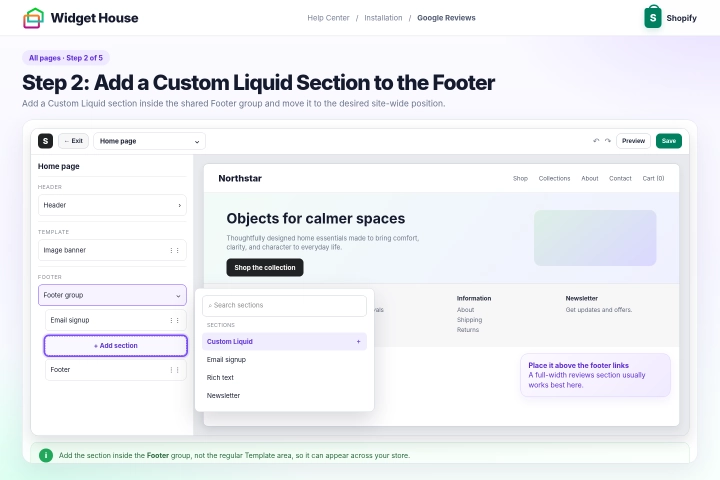
Open the Custom Liquid section and paste the complete Google Reviews Widget installation code from your Widget House dashboard.
Keep the script and widget container together in the same Custom Liquid section and in the original order. Do not edit the script URL, widget ID, or HTML container.
Do not wrap the code in additional <script>, <pre>, or <code> tags.
The code shown in the screenshots is an example. Use the installation code generated for your own widget before saving the changes.
Adjust the available section width, color scheme, and top or bottom spacing so the reviews fit naturally above the main footer content.
Step 3: Paste the Google Reviews Widget Code
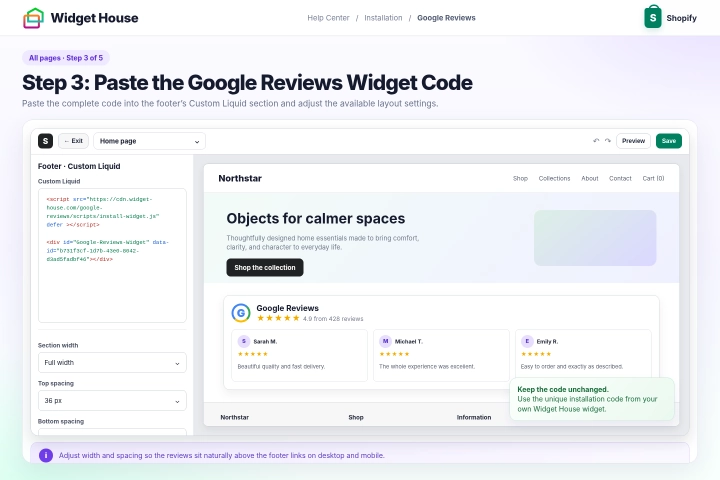
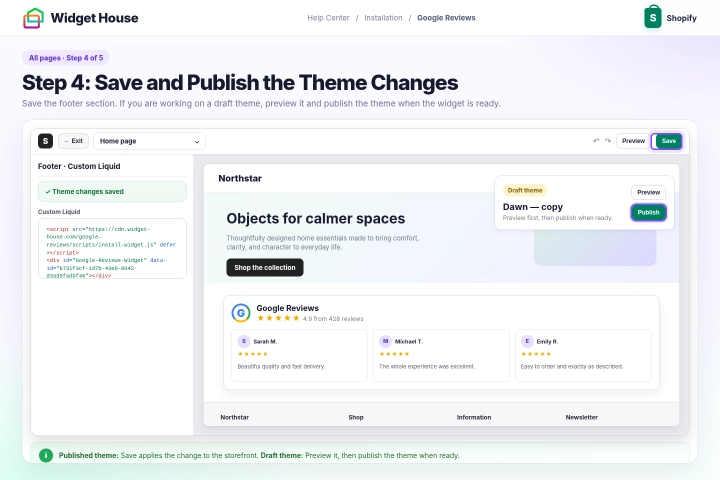
Click Save in the theme editor.
If you are editing the published theme, the saved changes are applied to your live storefront.
If you are editing a draft theme, preview several store pages and make sure the widget works correctly. Then publish the draft theme when you are ready to make it live.
The Google Reviews Widget might not load immediately inside the theme editor. Use the store preview or open the live storefront to check the final result.
Step 4: Save and Publish the Theme Changes
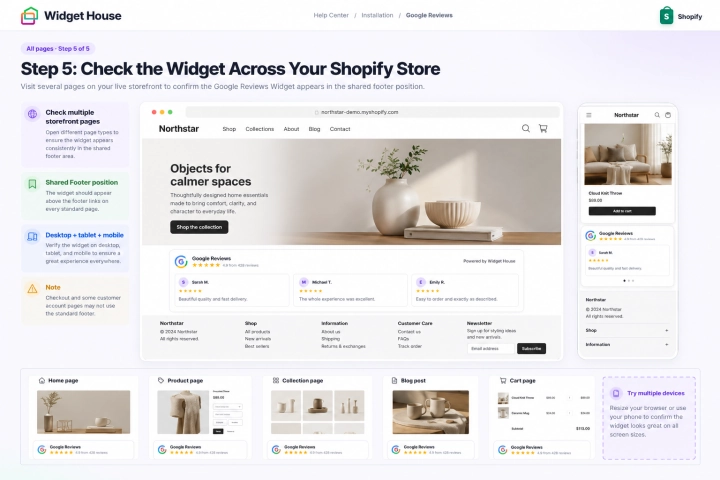
Open several storefront pages, such as the home page, a product page, a collection page, a standard page, a blog post, and the cart page.
The Google Reviews Widget should appear in the same Footer position on every Online Store page that uses the shared Footer area.
Check the widget on desktop, tablet, and mobile devices. Make sure it is fully visible and does not overlap navigation links, newsletter forms, payment icons, or other footer content.
This method applies to pages rendered by your Online Store theme. Checkout, some customer account pages, order-status surfaces, and other Shopify areas outside the regular theme might not display the shared Footer area. The password page also uses its own header and footer.
If the widget is missing from the entire store, make sure you edited and published the correct theme and pasted both parts of the installation code into the Custom Liquid section.
If the widget is missing from only one type of page, check whether that page uses a special template or layout without the standard Footer area.
If the widget appears twice, make sure the installation code has not also been added to an individual page template, another Custom Liquid section, or the theme code.
Step 5: Check the Widget Across Your Shopify Store
All set. Your Google Reviews Widget should now be working on your Shopify store.
Need a hand with setup?
Contact our support team at support@widget-house.com and we will help you get the widget running on your Shopify store.
support@widget-house.com