Want to display customer reviews from Google on your Webflow website? This guide explains how to add the Widget House Google Reviews Widget to one selected page or reuse it across your website with a Webflow component.
Before you begin, make sure you've created your widget and copied the installation code from your Widget House dashboard
Step-by-step guide to getting your Widget House widget code
Choose How You Want to Display the Widget
Add the widget to a single page
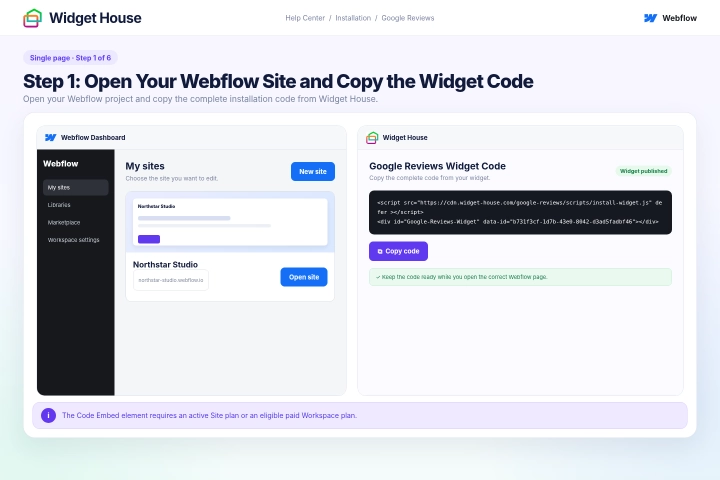
Log in to your Webflow account and open the website where you want to install the Google Reviews Widget.
Open your Widget House dashboard and copy the complete installation code for your Google Reviews Widget.
The Code Embed element is available when your site has an active Site plan or belongs to a Core, Growth, Agency, or Freelancer Workspace.
Step 1: Open Your Webflow Site and Copy the Widget Code
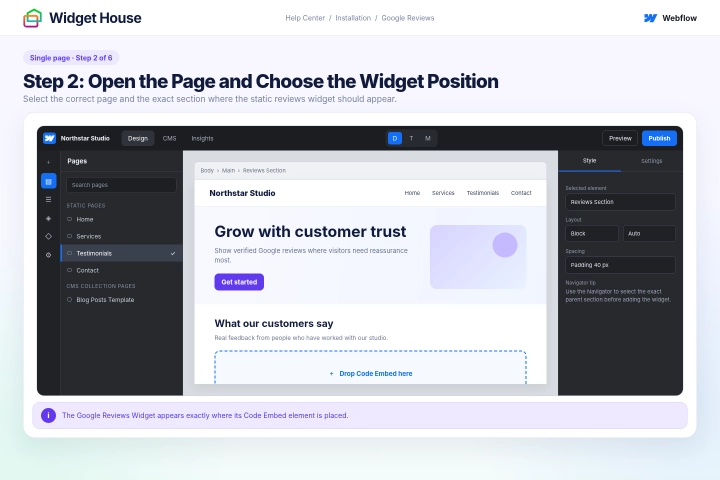
Open the Pages panel from the left toolbar and select the page where you want the Google Reviews Widget to appear.
The Google Reviews Widget is static, which means it appears exactly where its Code Embed element is placed.
Choose a suitable position for the reviews. For example, you can place the widget below a service description, above a contact form, before a call-to-action, or near the bottom of the page.
You can use the Navigator to select the exact section, container, or div block where the widget should be added.
Step 2: Open the Page and Choose the Widget Position
Open the Add panel by clicking the + icon in the left toolbar.
Find the Code Embed element and drag it to the exact position where you want the Google Reviews Widget to appear.
You can place the Code Embed directly on the canvas or use the Navigator for more precise placement inside a section, container, or div block.
Do not use the regular Code Block element. A Code Block displays formatted source code as page content, while Code Embed runs the HTML and JavaScript required by the widget.
Step 3: Add a Code Embed Element

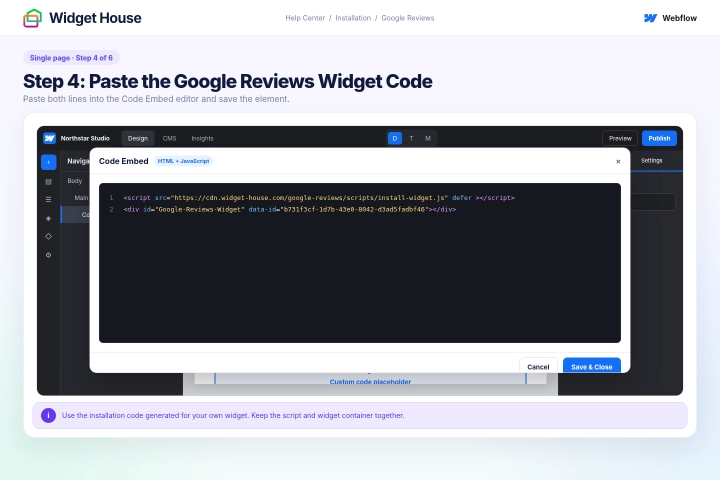
Paste the complete Google Reviews Widget installation code from your Widget House dashboard into the Code Embed editor.
Keep the script and widget container together in the same Code Embed element and in the original order. Do not remove, split, or change any part of the installation code.
Click Save & Close to apply the code.
The code shown in the screenshots is an example. Always use the installation code generated for your own widget so the correct reviews and design are displayed.
Step 4: Paste the Google Reviews Widget Code
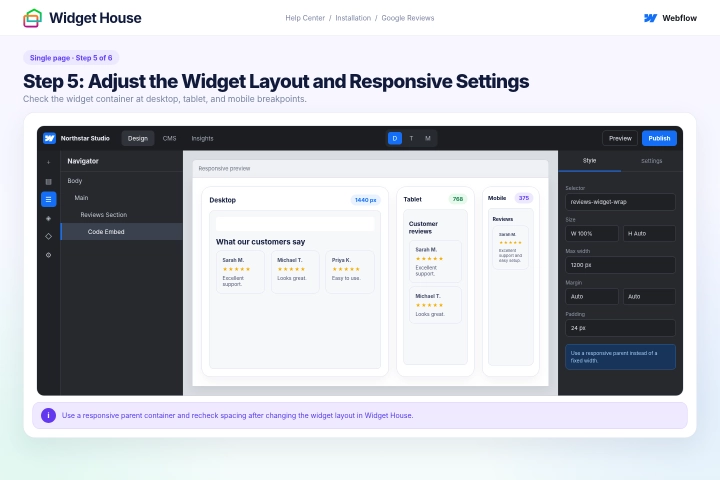
Select the Code Embed element or its parent container and use the Style panel to adjust its width, alignment, margins, and padding.
Make sure the widget has enough horizontal space to display the selected Google Reviews layout correctly.
Switch between the desktop, tablet, and mobile breakpoints and check the position and width of the widget at each breakpoint.
If necessary, adjust the parent container or section instead of setting a fixed size that may not work well on smaller screens.
If you change the widget layout or design later in Widget House, return to Webflow and check its spacing and responsive behavior again.
Step 5: Adjust the Widget Layout and Responsive Settings
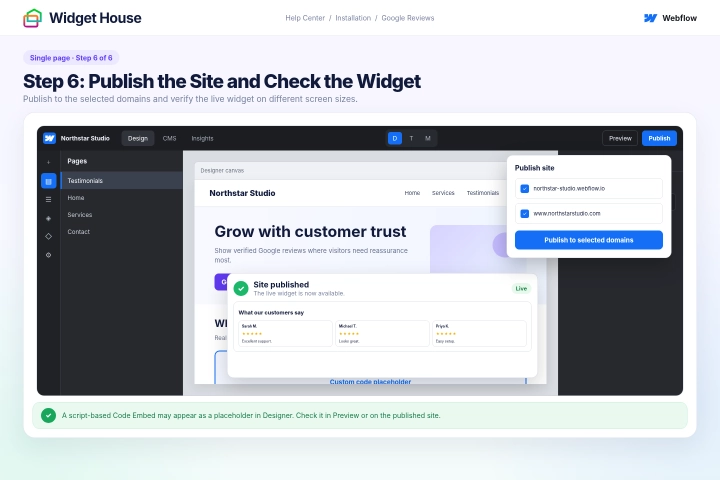
Click Publish, select the domains where you want to publish the changes, and click Publish to selected domains.
A Code Embed containing a <script> tag appears as a placeholder in the Webflow Designer instead of displaying the live widget directly on the canvas.
To test the widget before publishing, enter Preview mode and enable custom code using the toggle in the lower-left corner. Site managers can also enable Run custom code in Preview under Site settings → Custom code.
You can also publish the changes to your Webflow staging domain before publishing them to your production domain.
Open the preview or published page and make sure the Google Reviews Widget appears in the selected position and is fully visible.
Check the page at desktop, tablet, and mobile sizes. Make sure the widget does not overlap text, buttons, forms, or other page elements.
If the widget does not appear, confirm that the complete installation code was saved, publish the site again, and refresh the page.
Step 6: Publish the Site and Check the Widget
Show the widget on All pages
Show It on All Pages of Your Website
Because the Google Reviews Widget is static, it should remain in a specific and controlled position inside the page layout.
Webflow does not automatically add a regular component to every page. To display the widget across your website, add it to a Footer component that is already used on all pages, or place an instance of the Google Reviews component on each required static page and template.
If your website already uses a reusable Footer component across the site, open any instance of the footer and edit the main component.
If you do not have a reusable footer, open one of your pages and add a new section where you want the Google Reviews Widget to appear.
You can place the section above the footer, inside an editable footer area, or in another consistent position near the bottom of the page.
We do not recommend pasting the complete static widget code into Site settings → Custom code. That area adds code globally before the closing head or body tag but does not give you precise visual control over the position of a static widget.
Step 1: Open or Create a Reusable Site Section
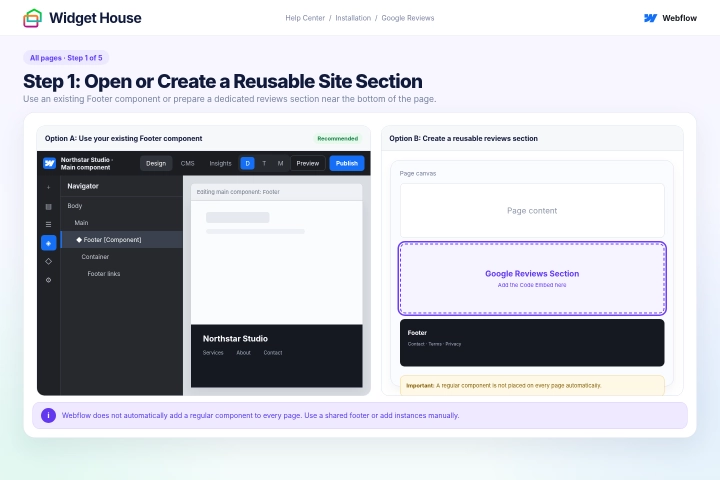
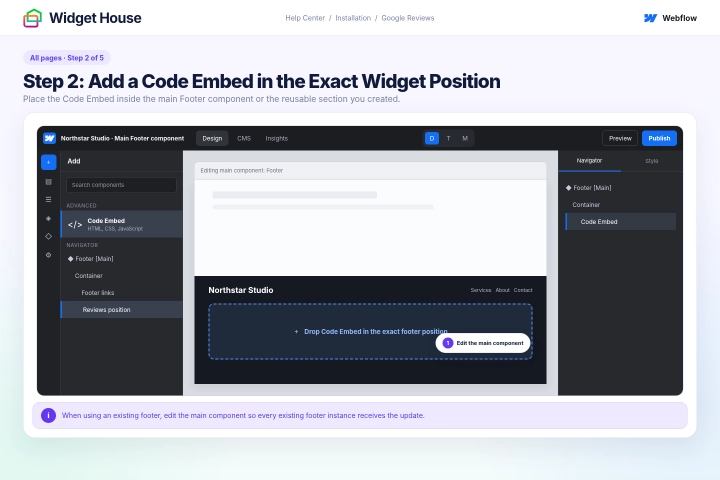
Open the Add panel and drag a Code Embed element into the selected footer, section, container, or div block.
Place the Code Embed exactly where you want the reviews to appear on every page.
If you are editing an existing Footer component, make sure you are editing the main component rather than changing only one individual instance.
Do not use a regular Code Block, because it displays source code as page content instead of running the widget.
Step 2: Add a Code Embed in the Exact Widget Position
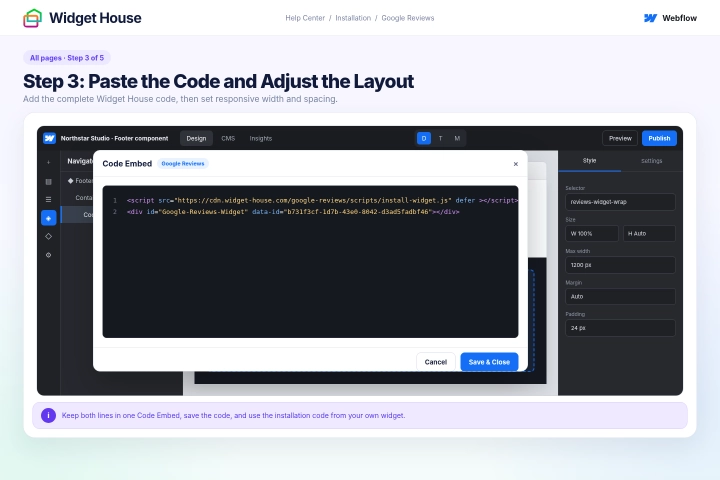
Paste the complete Google Reviews Widget installation code from your Widget House dashboard into the Code Embed editor.
Keep the script and widget container together in the same Code Embed element and in the original order. Do not edit the script URL, widget ID, or HTML container.
Click Save & Close.
Use the Style panel to adjust the width, alignment, margins, and padding of the Code Embed element or its parent container.
Check the section at the desktop, tablet, and mobile breakpoints and make sure the widget has enough space at each screen size.
The code shown in the screenshots is an example. Use the installation code generated for your own widget before publishing the website.
Step 3: Paste the Code and Adjust the Layout
If you added the widget to an existing Footer component that is already used across your website, the update will be applied to every existing instance of that component. You can proceed to the next step.
If you created a new section, select the entire section containing the Code Embed element.
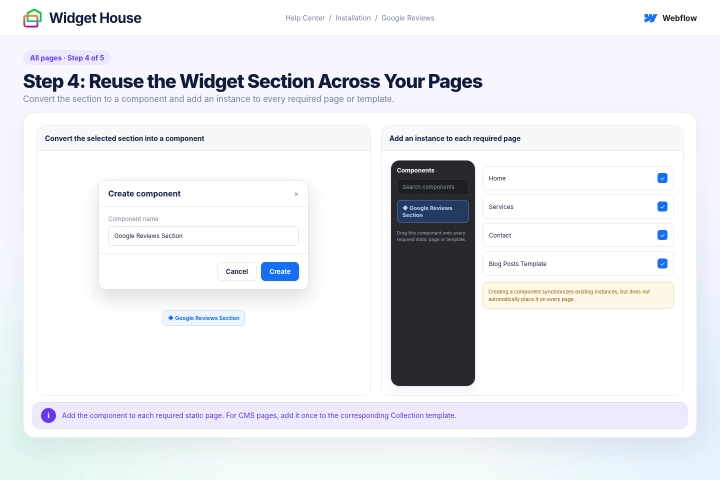
Open the Components panel, click the new component icon, and select Convert selection.
Give the component a clear name, such as Google Reviews Section, and click Create.
Open each static page where you want the widget to appear, then drag the Google Reviews Section component from the Components panel to the required position on the canvas or in the Navigator.
For CMS Collection pages, add the component to the corresponding Collection template once. It will then appear on the Collection pages that use that template.
Creating the component keeps its structure and design synchronized between existing instances, but it does not automatically place the component on every page.
If you create new pages later, remember to add the Google Reviews Section component to those pages as well.
Step 4: Reuse the Widget Section Across Your Pages
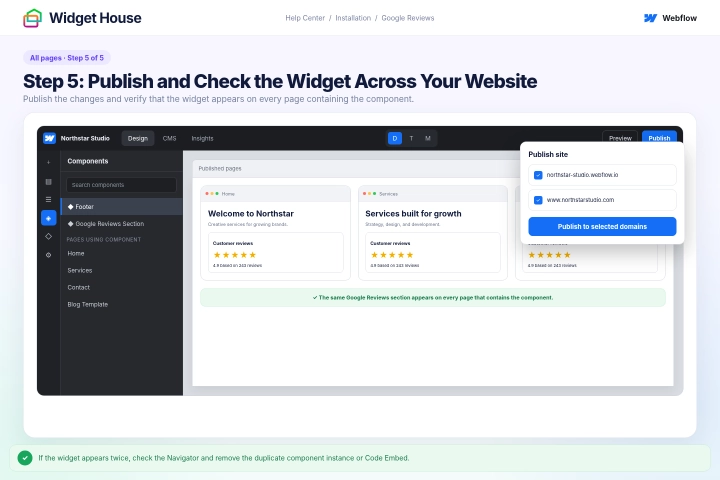
Click Publish, select the required domains, and click Publish to selected domains.
Open several pages of your website, such as the home page, contact page, product or service page, and a CMS Collection page if applicable.
The Google Reviews Widget should appear in the selected position on every page that contains the Footer component or Google Reviews Section component.
Check the widget at desktop, tablet, and mobile sizes. Make sure it is fully visible and does not overlap navigation, forms, buttons, or other content.
If the widget is missing from a page, make sure the correct component has been added to that page or its template.
If the widget appears twice, check the Navigator and make sure the page does not contain both a Footer component with the widget and a separate Google Reviews Section component. Remove the duplicate component instance or Code Embed element.
Step 5: Publish and Check the Widget Across Your Website
All set. Your Google Reviews Widget should now be working on your Webflow website.
Need a hand with setup?
Contact our support team at support@widget-house.com and we will help you get the widget running on your Webflow website.
support@widget-house.com