Want to display customer reviews from Google on a WordPress website built with Elementor? This guide explains how to add the Widget House Google Reviews Widget to one selected page or display it across your website in an Elementor footer template.
Before you begin, make sure you've created your widget and copied the installation code from your Widget House dashboard
Step-by-step guide to getting your Widget House widget code
Choose How You Want to Display the Widget
Add the widget to a single page
Log in to your WordPress dashboard and make sure Elementor is active on your website.
Open your Widget House dashboard and copy the complete installation code for your Google Reviews Widget.
Keep the installation code ready while you open the required page in Elementor.
If you cannot find or use the Elementor HTML widget, ask a website administrator to check your WordPress user role and Elementor Role Manager permissions.
Step 1: Log In to WordPress and Copy the Widget Code

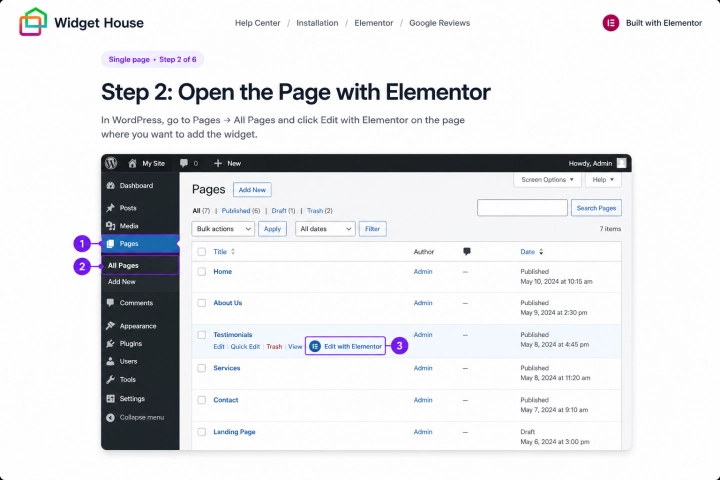
In the WordPress dashboard, go to Pages → All Pages.
Find the page where you want the Google Reviews Widget to appear and click Edit with Elementor.
If the page is already open in the standard WordPress editor, click Edit with Elementor to launch the Elementor Editor.
Wait for the page and the Elementor elements panel to finish loading before continuing.
Step 2: Open the Page with Elementor
The Google Reviews Widget is static, which means it appears exactly where the Elementor HTML widget is placed.
Choose the section or container where you want visitors to see the reviews. For example, you can place the widget below a service description, above a contact form, before a call-to-action, or near the bottom of the page.
If necessary, add a new container or section to keep the reviews separate from the surrounding page content.
You can also use the Elementor Navigator to select the exact container where the widget should be added.
Make sure the selected area has enough horizontal space for your Google Reviews layout.
Step 3: Choose the Exact Position for the Widget

Use the search field in the Elementor elements panel to search for HTML.
Find the Elementor HTML widget with the </> icon and drag it to the exact position selected in the previous step.
Wait until the placement indicator appears in the required container, then release the widget.
For this installation method, use Elementor's HTML widget rather than the Text Editor, Code Highlight, Shortcode, or standard WordPress Custom HTML block.
Step 4: Add the Elementor HTML Widget
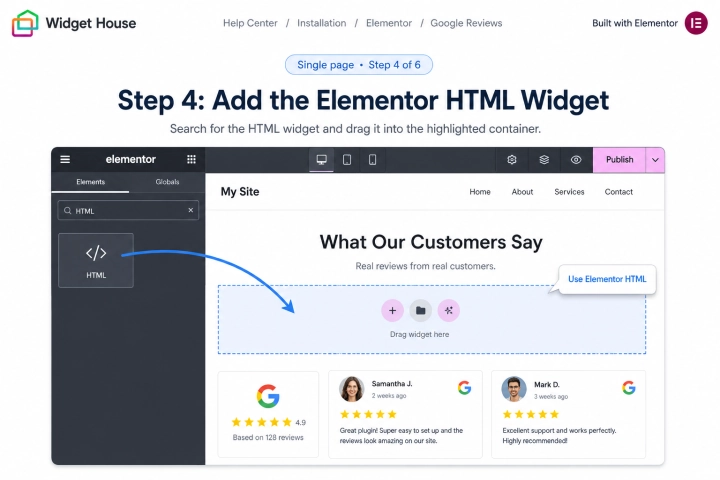
Select the HTML widget and paste the complete Google Reviews Widget installation code from your Widget House dashboard into the HTML Code field.
Keep the script and widget container together in the same HTML widget and in the original order. Do not remove, split, or change any part of the installation code.
The code shown in the screenshots is an example. Always use the installation code generated for your own widget so the correct reviews and design are displayed.
The Google Reviews Widget may appear directly on the Elementor canvas after the code loads. If it does not appear inside the editor, use Preview or check the live page after saving your changes.
Step 5: Paste the Google Reviews Widget Code

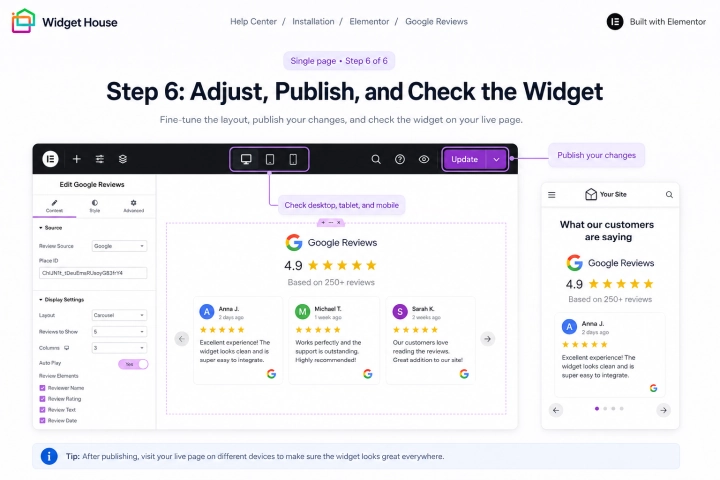
Select the HTML widget or its parent container and adjust its width, alignment, margins, and padding if necessary.
Use Elementor's responsive controls to check the widget in desktop, tablet, and mobile views. Make sure the reviews fit within the page and do not overlap text, buttons, forms, or other elements.
Click Publish if this is a new page, or click Update if the page is already published.
Open the live page in a new browser tab and make sure the Google Reviews Widget appears in the selected position.
If the widget does not appear, confirm that the complete code was saved and open the page in a private browser window.
If your latest changes are not visible, go to Elementor → Editor → Tools, click Clear Files & Data, and then click Save Changes. You may also need to clear your WordPress caching plugin, server cache, browser cache, or CDN cache.
Step 6: Adjust, Publish, and Check the Widget
Show the widget on All pages
Show It on All Pages of Your Website
Because the Google Reviews Widget is static, we recommend adding it to an Elementor Footer template when you want it to appear across your website.
This gives the widget a specific and consistent position at the bottom of every page that uses the same footer.
Plan requirement: This installation method requires access to Elementor Theme Builder.
In the WordPress dashboard, go to Elementor → Theme Builder. In some Elementor installations, this section may appear under Templates → Theme Builder.
Do not use Elementor Custom Code for the complete static widget. Custom Code can load scripts globally, but it does not provide a controlled visual position for the Google Reviews container.
If Theme Builder is not available, follow the WordPress installation guide to add the widget to a footer area supported by your WordPress theme.
Step 1: Open Elementor Theme Builder
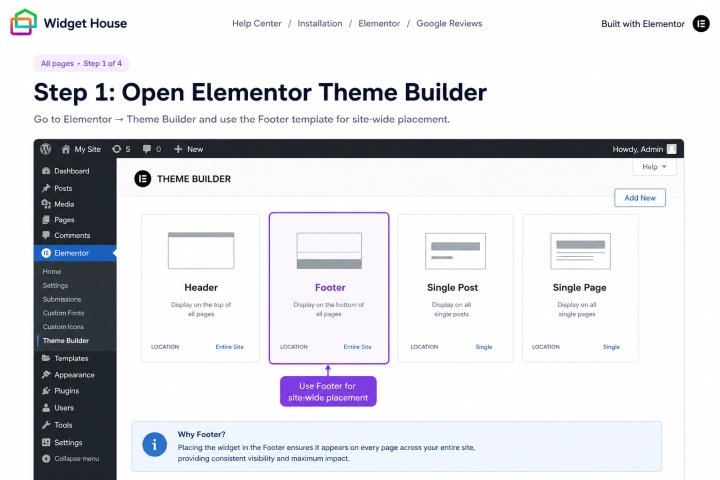
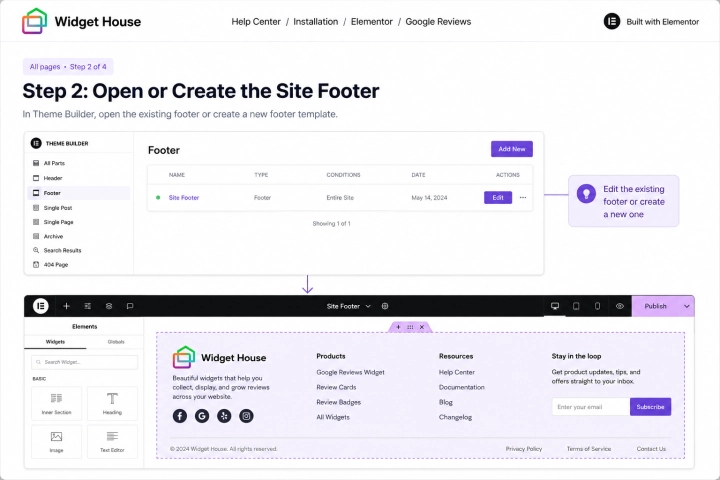
In Theme Builder, select the Footer site part.
If your website already has an Elementor Footer template, open it and click Edit. Editing the existing footer is the safest option because it preserves the footer design already used by your website.
If no Elementor Footer exists, click the + icon in the Footer card to create one.
You can select a footer from the Elementor Template Library or close the library and create the footer from scratch.
A new Elementor Footer template may replace the footer supplied by your WordPress theme on pages covered by its display conditions. Before publishing it, recreate or preserve any navigation links, contact details, copyright information, or other footer content that your website currently uses.
Choose the exact position in the footer where you want the Google Reviews Widget to appear. A full-width container above the main footer links is usually a suitable location.
Step 2: Open or Create the Site Footer
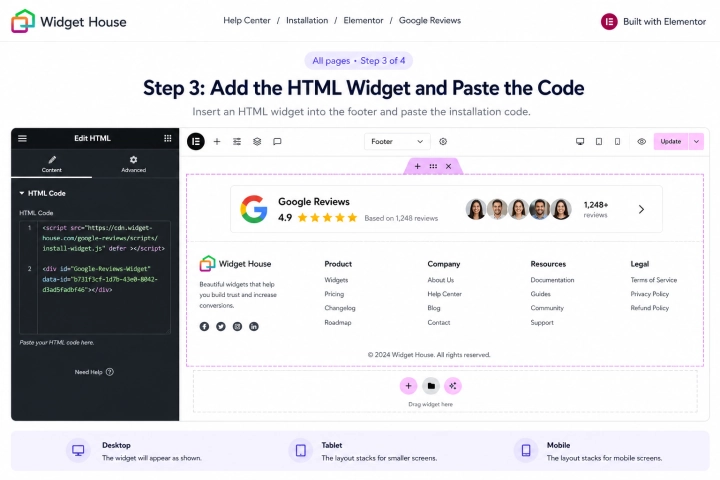
Search for the Elementor HTML widget in the elements panel and drag it into the selected footer container.
Paste the complete Google Reviews Widget installation code from your Widget House dashboard into the HTML Code field.
Keep the script and widget container together in the same HTML widget and in the original order. Do not edit the script URL, widget ID, or HTML container.
The code shown in the screenshots is an example. Use the installation code generated for your own widget before publishing the footer.
Select the HTML widget or its parent container and adjust its width, alignment, margins, and padding so the reviews fit naturally within the footer layout.
Check the footer in Elementor's desktop, tablet, and mobile views and adjust the layout where necessary.
Step 3: Add the HTML Widget and Paste the Code
If you created a new Footer template, click Publish. If you edited an existing footer, click Update.
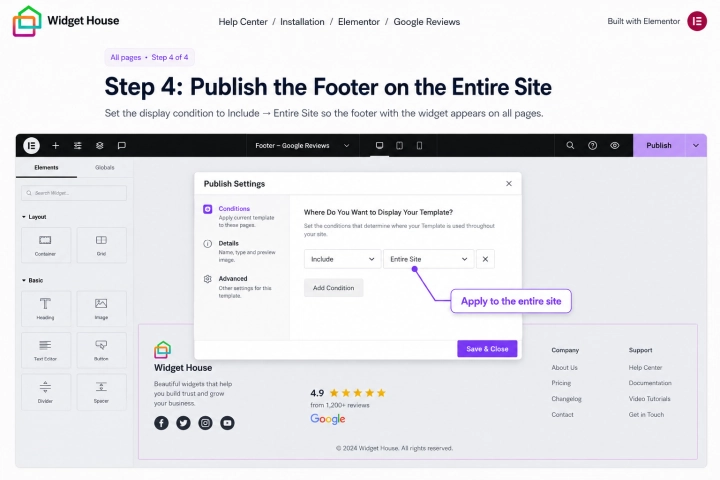
When the Display Conditions window opens, click Add Condition.
Select Include → Entire Site to display the Footer template and the Google Reviews Widget across your website.
Click Save & Close to apply the display conditions.
If you edited an existing Footer template and the conditions window did not open, click the arrow next to Update and select Display Conditions. You can also return to Theme Builder and click Edit Conditions.
Make sure there are no exclusion conditions that prevent the Footer template from appearing on pages where you want to display the widget.
Step 4: Publish the Footer on the Entire Site
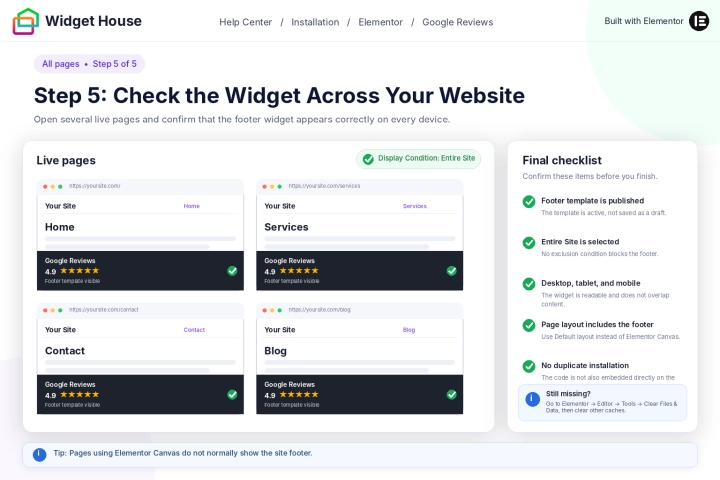
Open several live pages of your website, such as the home page, contact page, product or service page, and a blog post.
The Google Reviews Widget should appear in the same footer position on every page covered by the Footer template's display conditions.
Check the widget on desktop, tablet, and mobile devices. Make sure it is fully visible and does not overlap footer links, forms, buttons, or other content.
If the widget or the Elementor footer is missing from a page, make sure the Footer template is published and its Display Condition is set to Entire Site.
Also check the affected page's layout. Pages using Elementor Canvas do not normally display the website header or footer. Use the Default layout or another layout that includes the footer when the widget should be visible.
If your latest changes are not visible, go to Elementor → Editor → Tools, click Clear Files & Data, and then click Save Changes. You may also need to clear your WordPress, server, browser, and CDN caches.
If the widget appears twice, check whether the installation code has been added both to the Footer template and directly to the page, or to more than one active Footer template.
Step 5: Check the Widget Across Your Website
All set. Your Google Reviews Widget should now be working on your WordPress website with Elementor.
Need a hand with setup?
Contact our support team at support@widget-house.com and we will help you get the widget running on your Elementor website.
support@widget-house.com